FastSealCreator5 uses a MySQL database to host all content that can be shared between all workstations within your company. This is especially useful if you have more than one license, so all data like raw material stock, clients, executed works, company information, statistics, and more, are accessible everywhere.
For this use case, you may wish to setup a new database on a dedicated server. The following steps will guide you on how to achieve a clean install of MySQL server.
1.Download and install MySQL
For windows based installations you can get the latest community version from: https://dev.mysql.com/downloads/installer/
For other operating systems, check you distro specific instructions. You will need to adapt this guide and specific commands.
If asked for a password during installation, take note of this, as it will be important for the next steps.
2. Initialize database schema
After the server is installed and running, you need to create a new empty database.
You need to locate the mysql.exe in the MySQL installation folder in your server. By default on windows server:
c:\Program Files\MySQL\MySQL Server 8.0\bin
Run the following commands to create a database called fastsealcreator5, a user named “fast” and set permissions:
cd c:\Program Files\MySQL\MySQL Server 8.0\bin

mysql --user=root --password=fast -e "CREATE SCHEMA `fastsealcreator5`;"

mysql --user=root --password=fast -e "CREATE USER 'fast'@'%%' IDENTIFIED BY 'fast';"

mysql --user=root --password=fast -e "GRANT ALL ON fastsealcreator5.* TO 'fast'@'%%'; FLUSH PRIVILEGES;"

mysql --user=root --password=fast -e "CREATE TABLE IF NOT EXISTS `FastSealCreator5`.`Versions` (`name` VARCHAR(20) NOT NULL,`value` INT NULL, PRIMARY KEY (`name`)) ENGINE = InnoDB;"

mysql --user=root --password=fast -e "START TRANSACTION; USE `FastSealCreator5`; INSERT INTO `FastSealCreator5`.`Versions` (`name`, `value`) VALUES ('highestVersion', 5000); INSERT INTO `FastSealCreator5`.`Versions` (`name`, `value`) VALUES ('mysqlRequired', 5000); COMMIT;"
Note that you should use your password that you set during Step1.
3. Point FastSealCreator5 to the new database

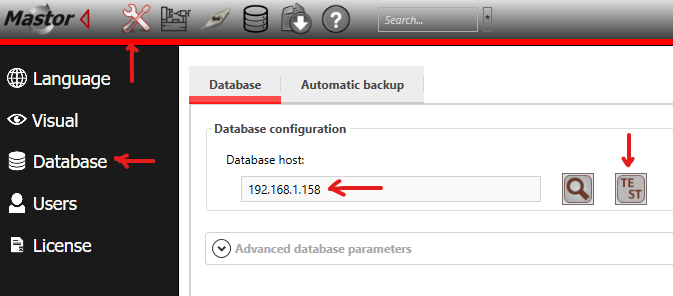
Enter the hostname of your server or it’s ip address into the textbox and press TEST. If the indicator turns green, the software was able to connect to the server. Press Save. Restart FastSealCreator5 to create the required tables.
If different settings were used in the previous steps, you will have to modify the advanced database parameters.
4. Restore database from backup (optional)
Starting in version 5.2.4.3 a restore database functionality was added to the database settings page.
You will need to login as root to access this option, then choose a zip file created by the built-in backup with the data you wish to restore.
Note that this will replace all FastSealCreator’s data you may have currently on the MySQL Server.
